Post by Lady Idril on Jan 7, 2006 17:58:39 GMT -5
I’ve been involved in graphic design for roughly two years and creating avatars was one of the easiest (though detailed) forms of fanart I’ve come across. You don’t need to be experienced in graphic design, but you will not, however, be able to create most of these effects in the default Paint that comes with most PCs.
What We’re Going To Do:
we are going to turn this photo from Disney’s (and C. S. Lewis’) The Chronicles of Narnia: The Lion The Witch and The Wardrobe:

into a pretty avatar!
What You’ll Need:
- a graphics program for editing, etc. I use Paint Shop Pro 9 by Corel/Jasc; you can get a free 30-day trial of the newest version of the Paint Shop series here:
www.corel.com/servlet/Satellite?pagename=Corel3/Trials/Login&pid=1047025487586&cid=1047025490241
Note: the above is a free trial of Paint Shop Pro X, the latest version of Corel’s Paint Shop series. I have never seen the layout of this new Paint Shop and can only assume that its general layout is
similar - at least the terms I use should comply with the ones you’ll see on your version. If you do not want to download a graphics program and have only MS Paint to work with, you will have to skip the “Gradient” and “Border” steps.
- most people enjoy pixel fonts for avatars because of the clean look they have. The best pixel fonts do not have anti-aliasing. Anti-aliasing is usually a good thing: it manages to smooth the line of a text into the background image. However, when dealing with fonts in such small sizes, the smoothing effect only manages to blur the text. I recommend using 04b03 which can be downloaded from www.dafont.com for free.
- the following picture which was found at www.outnow.ch/media/img
Note: I’ve already cropped this image, bringing the character of Edmund closer to the character of Aslan the Lion, general resizing of the original photo, etc. I’ll be explaining cropping images in a later tutorial.
Creating an Avatar:
Step 1: Finding and Saving Your Picture
The first step in making an avatar is to find an image to use as your background. In this case, our background picture is the one just above of Edmund and Aslan from Disney’s Chronicles of Narnia. What you’ll do when you find the picture you want, would be to right click the image, and hit the “Save Image As...” button. You’ll then be prompted to select a place to save the image and a name to save it under. (Don’t forget where you save your picture!)
Step 2: Open Your Saved Image
Simple step, really. In your graphics program, select “File” and then “Open...” [Ctrl+O]
Step 3: Gradient
Once you’ve opened your image, it’s time to add the color gradient. First, create a new layer by clicking the New Raster Layer button under the “Layers” tap on the right:

This new layer will be the one we are applying the color gradient to. But we must first make the background invisible while we work on the gradient layer. To do this, simply press the Invisibility Toggle button beside the “Background” image in the “Layer” tab:
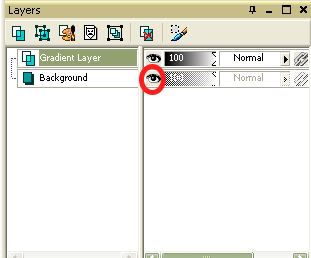
Pressing this button makes the layer invisible, but pressing it once more will make it visible. Don’t worry, you’re picture is still there. Keep the visibilty off for the time being while we apply the gradient.
Select the Flood Fill/paint bucket tool from the left-side toolbar. We’ll use this to fill the empty layer. Now’s your time to play around with the colors under the Materials tab on the right side and find the ones you like best. For example, I’ll be using the following colors for my Edmund & Aslan avatar:

simply click any color on the Color Pallette to set it as the foreground, and right-click any color to set it as the background. The top color box (show white here) is, of course, your foreground and the bottom color box (shown blue here) is the background.
Once you have your colors selected, it’s time to make the fill a gradient. To do this, simply click the black dot (which is visible in the above picture) and select the middle circle, which shows white fading to black:

Note: you only do this to the foreground (top) color. The background (bottom) color stays as is.
Now we want to make sure our gradient is a “Foreground-background” blend, so we click anywhere insinde the foreground (top) color box. The settings should look as follows.

If your screen doesn’t look the same, it’s quite simple. To set your gradient as “Foreground-Background” simply click the “black arrow” on the side of the “example box” (or you can click anywhere in the example box - that works, too). You’ll see a lot of choices (don’t get overwhelmed!) Select the one that says “Foreground-backgroud”
My angle is set at 322, as shown above, but you can change that around and experiment with it all you like.
Now we’ll use the paint bucket tool we selected before and fill the empty gradient layer so it looks like so:

You’ve made a gradient layer! Now just make the background image visible again by clicking that same little eyeball button. You won’t see it at first because we’re not done yet
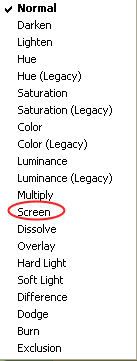
If you’ll notice in the above picture, there is a tap beside the invisibility button that says “Normal”. This is the blend mode. You’ll also see how there is a “Blend Mode Button” for each layer you have. We’re not going to change the background mode, because you can’t, simple as that. No, now we’re looking to the layer above it, the Gradient Layer. When you click the “Mode Button” [the one that says ‘Normal’] you’ll be given a good deal of choices. You can change them around to whichever you like. I’ll be selecting “Screen”:

In between the invisibility button and the blend mode button is a long section that says “100". This is the opacity. You simply drag the “marker” to toggle with the opacity. This isn’t a necessary option, in fact I won’t be using it in my avatar, but it helps to tone down the color gradient if it’s too much.

And we’re done with the gradient!
Step 4: Adding Text
I like to use the font 04b03, as I said before, and that’s the one I’ll be using here. Just simply select the “A” tool from the left side toolbar, choose your color as you did when making the gradient, and click wherever you want your text to be. Then type!
Important: when choosing a color, the background (bottom) color box will be the color of the text. So just make sure the bottom box in the “Materials” pallette is the color you want your text to be.
For my avatar, I’m selecting a blue color. Another note, if you do use the font 04b03 you need to make sure the font size is “6". It’s the only way the font looks decent. The font size and font style options are in a toolbar which appears whenever you select the “A” tool.
Step 5: Adding a Border and Saving Your Image
Almost done! A border helps to finish up your image, to keep it contained. To add one, click “Image” in the upmost toolbar, then “Add Borders...” You’ll then be presented with this page:
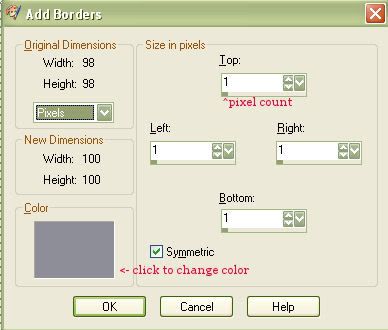
The pixel count will change how think the border is. I prefer to use only one pixel all around for a thin, clean line. You can also change your color. I’ll be using a blue shade.
Now you’re done! Just save the image by clicking “File” and “Save”. Or click “File” and “Save Image As...” if you want to save it under a different name. That’s it! Here’s my finished avatar!

You did it! Congratulations! You get a cookie for understanding my banter!
What We’re Going To Do:
we are going to turn this photo from Disney’s (and C. S. Lewis’) The Chronicles of Narnia: The Lion The Witch and The Wardrobe:
into a pretty avatar!
What You’ll Need:
- a graphics program for editing, etc. I use Paint Shop Pro 9 by Corel/Jasc; you can get a free 30-day trial of the newest version of the Paint Shop series here:
www.corel.com/servlet/Satellite?pagename=Corel3/Trials/Login&pid=1047025487586&cid=1047025490241
Note: the above is a free trial of Paint Shop Pro X, the latest version of Corel’s Paint Shop series. I have never seen the layout of this new Paint Shop and can only assume that its general layout is
similar - at least the terms I use should comply with the ones you’ll see on your version. If you do not want to download a graphics program and have only MS Paint to work with, you will have to skip the “Gradient” and “Border” steps.
- most people enjoy pixel fonts for avatars because of the clean look they have. The best pixel fonts do not have anti-aliasing. Anti-aliasing is usually a good thing: it manages to smooth the line of a text into the background image. However, when dealing with fonts in such small sizes, the smoothing effect only manages to blur the text. I recommend using 04b03 which can be downloaded from www.dafont.com for free.
- the following picture which was found at www.outnow.ch/media/img
Note: I’ve already cropped this image, bringing the character of Edmund closer to the character of Aslan the Lion, general resizing of the original photo, etc. I’ll be explaining cropping images in a later tutorial.
Creating an Avatar:
Step 1: Finding and Saving Your Picture
The first step in making an avatar is to find an image to use as your background. In this case, our background picture is the one just above of Edmund and Aslan from Disney’s Chronicles of Narnia. What you’ll do when you find the picture you want, would be to right click the image, and hit the “Save Image As...” button. You’ll then be prompted to select a place to save the image and a name to save it under. (Don’t forget where you save your picture!)
Step 2: Open Your Saved Image
Simple step, really. In your graphics program, select “File” and then “Open...” [Ctrl+O]
Step 3: Gradient
Once you’ve opened your image, it’s time to add the color gradient. First, create a new layer by clicking the New Raster Layer button under the “Layers” tap on the right:
This new layer will be the one we are applying the color gradient to. But we must first make the background invisible while we work on the gradient layer. To do this, simply press the Invisibility Toggle button beside the “Background” image in the “Layer” tab:
Pressing this button makes the layer invisible, but pressing it once more will make it visible. Don’t worry, you’re picture is still there. Keep the visibilty off for the time being while we apply the gradient.
Select the Flood Fill/paint bucket tool from the left-side toolbar. We’ll use this to fill the empty layer. Now’s your time to play around with the colors under the Materials tab on the right side and find the ones you like best. For example, I’ll be using the following colors for my Edmund & Aslan avatar:
simply click any color on the Color Pallette to set it as the foreground, and right-click any color to set it as the background. The top color box (show white here) is, of course, your foreground and the bottom color box (shown blue here) is the background.
Once you have your colors selected, it’s time to make the fill a gradient. To do this, simply click the black dot (which is visible in the above picture) and select the middle circle, which shows white fading to black:
Note: you only do this to the foreground (top) color. The background (bottom) color stays as is.
Now we want to make sure our gradient is a “Foreground-background” blend, so we click anywhere insinde the foreground (top) color box. The settings should look as follows.
If your screen doesn’t look the same, it’s quite simple. To set your gradient as “Foreground-Background” simply click the “black arrow” on the side of the “example box” (or you can click anywhere in the example box - that works, too). You’ll see a lot of choices (don’t get overwhelmed!) Select the one that says “Foreground-backgroud”
My angle is set at 322, as shown above, but you can change that around and experiment with it all you like.
Now we’ll use the paint bucket tool we selected before and fill the empty gradient layer so it looks like so:
You’ve made a gradient layer! Now just make the background image visible again by clicking that same little eyeball button. You won’t see it at first because we’re not done yet

If you’ll notice in the above picture, there is a tap beside the invisibility button that says “Normal”. This is the blend mode. You’ll also see how there is a “Blend Mode Button” for each layer you have. We’re not going to change the background mode, because you can’t, simple as that. No, now we’re looking to the layer above it, the Gradient Layer. When you click the “Mode Button” [the one that says ‘Normal’] you’ll be given a good deal of choices. You can change them around to whichever you like. I’ll be selecting “Screen”:
In between the invisibility button and the blend mode button is a long section that says “100". This is the opacity. You simply drag the “marker” to toggle with the opacity. This isn’t a necessary option, in fact I won’t be using it in my avatar, but it helps to tone down the color gradient if it’s too much.
And we’re done with the gradient!
Step 4: Adding Text
I like to use the font 04b03, as I said before, and that’s the one I’ll be using here. Just simply select the “A” tool from the left side toolbar, choose your color as you did when making the gradient, and click wherever you want your text to be. Then type!
Important: when choosing a color, the background (bottom) color box will be the color of the text. So just make sure the bottom box in the “Materials” pallette is the color you want your text to be.
For my avatar, I’m selecting a blue color. Another note, if you do use the font 04b03 you need to make sure the font size is “6". It’s the only way the font looks decent. The font size and font style options are in a toolbar which appears whenever you select the “A” tool.
Step 5: Adding a Border and Saving Your Image
Almost done! A border helps to finish up your image, to keep it contained. To add one, click “Image” in the upmost toolbar, then “Add Borders...” You’ll then be presented with this page:
The pixel count will change how think the border is. I prefer to use only one pixel all around for a thin, clean line. You can also change your color. I’ll be using a blue shade.
Now you’re done! Just save the image by clicking “File” and “Save”. Or click “File” and “Save Image As...” if you want to save it under a different name. That’s it! Here’s my finished avatar!
You did it! Congratulations! You get a cookie for understanding my banter!